

Why I Chose the Snapmaker U1
When Snapmaker announced the U1 Color 3D Printer (with its “SnapSwap” system, multi-tool heads, and promises of fast color/material switching) I was intrigued — but also skeptical. Multicolor and multi-material printing has long been a kind of “holy grail” in desktop FDM: lots of promise, lots of compromise.
One big question for me: how compatible will it be with third-party filaments and existing 3D printer workflows? Many toolchanger or multi-material printers force you into proprietary filaments, rigid pipelines, or heavy purge waste. If I were to adopt one, I wanted flexibility, reliability, and real-world ease for both basic and ambitious prints.
By the time I began testing, there were some promising reviews and spec sheets:
-
Tom’s Hardware praised the U1 for being an “affordable tool changer that doesn’t waste your filament,” with a 270×270×270 mm build volume, Klipper firmware, and good auto leveling.
-
TechRadar noted the U1’s four independently swappable tool heads, fast swaps, and minimal filament waste.
-
The U1 is launched via a Kickstarter campaign, with Snapmaker claiming it prints up to 5× faster than comparable desktop machines and reduces filament waste drastically during material changes.
So, my mission: treat the U1 like a daily driver, push it with complex multi-color and multi-material prints, test with third-party filaments, and see if it’s forgiving (or punishing). Below is what I found.
Unboxing, Setup & First Impressions
What’s in the Box & Physical Build
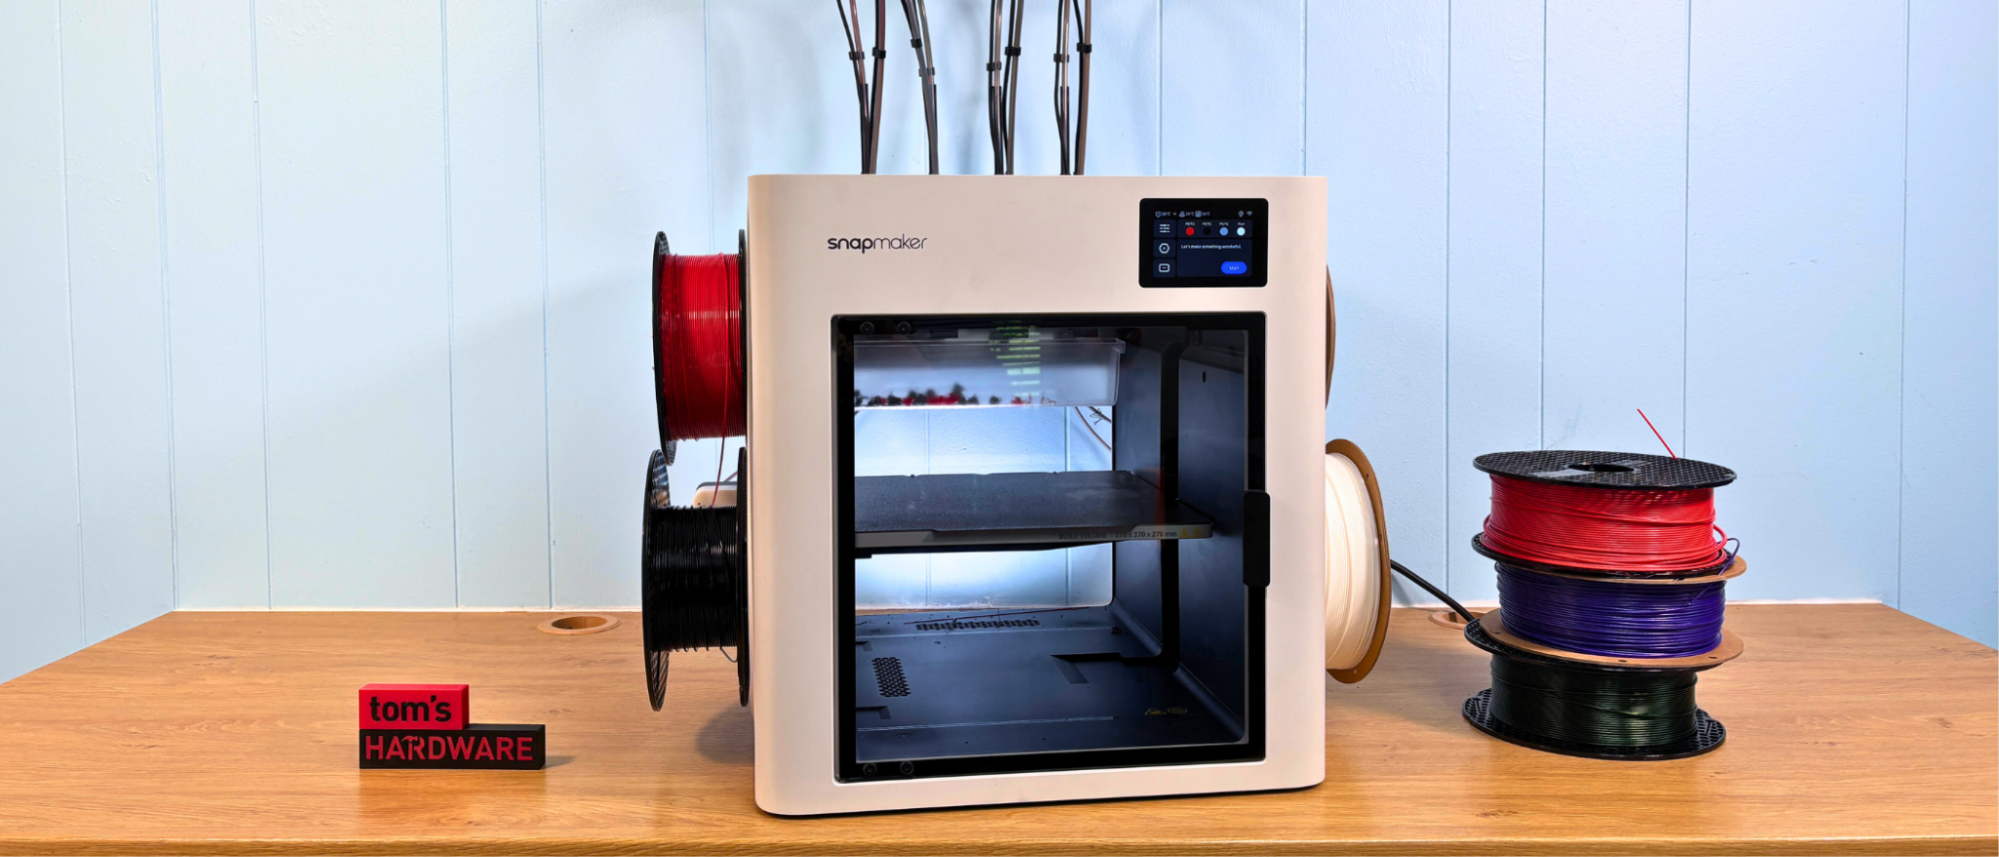
The U1 arrives mostly assembled. When I unpacked it, the frame was rigid, with clear panels (though note: the top cover/enclosure is optional, at least at kickstart) as reviewers have noted. The four tool heads are in a docked “carousel” arrangement, ready to slide out and be put into use.
The spool holders mount on the sides, and the filament input paths are wide, open tubes. I liked that part: feeding TPU or flexible filament through those tubes was far less finicky than in some tight Bowden systems. (I’ll come back to filament compatibility later.)
Initial physical checks: the frame felt sturdy, tolerances looked tight, cables were neatly routed, rails were smooth. No obvious assembly nightmares. The build plate is double-sided PEI flex plate (magnetic, strong).
Software & Slicer Workflow
Snapmaker is using OrcaSlicer, a fork of Bambu-style slicer, integrated with the U1 ecosystem. Reviewers praised this choice as making the learning curve gentler for users familiar with modern slicers. The printer firmware is based on Klipper, which gives it flexibility, fast responsiveness, and often better motion control.
During setup, the U1 guided me through auto-leveling, tool head alignment, and vibration tests (input shaping). The leveling was fully automatic. The tool head alignment (using an eddy current sensor) also needed minimal intervention.
The user interface is a 3.5-inch touchscreen. It lets you pick filaments, view camera, start prints, etc. One caveat: some reviewers pointed out that camera streaming only worked via Snapmaker’s cloud for now, which may require further firmware updates.
By the time I hit “print,” the machine looked ready. Did it deliver? Let me take you through my real-print experience.
Real-World Print Experience: Successes & Struggles
I’ll break this into sections (PLA basics; multi-color & multi-material; advanced filaments; failures, recovery, lessons learned).
PLA & Everyday Prints (Baseline Reliability)
To establish a baseline, I printed typical beginner models: calibration cubes, Benchy, tool holders, phone stands—all using standard PLA (third-party filament). This is where any good printer must perform well before we expect it to handle more exotic tasks.
-
The first calibration cube (20×20×20 mm) came out nearly perfect. Dimensions were spot on.
-
A single-color Benchy printed smoothly, with crisp detail, minimal stringing, and good bridging performance.
-
Daily tools (filament guides, clamps, clips) printed reliably. Even when I forgot to enable a brim on some larger prints, the parts adhered well to the PEI plate after a quick wipe of isopropyl.
-
I ran several such prints back-to-back (10+ hours of print time) and experienced zero layer shifts or crashes. No re-leveling required in that run.
Conclusion: as a “normal printer,” the U1 handles PLA wonderfully. It’s a strong foundation before attempting color or material switching.
Multi-Color & Multi-Material Prints — The Real Test
This is the part that many users will buy a printer like the U1 for. How well does it manage multiple filaments, color transitions, material differences, and workflow complexity?
1. Multi-Color Benchy & Color Swaps
One of my first experiments was a 4-color Benchy (each color used on different zones). In OrcaSlicer, I assigned different color groups and layers, then let the tool-change logic handle the rest.
What impressed me:
-
Tool head swap times were very fast (on the order of 10–12 seconds or less), consistent with what Tom’s Hardware observed. Tom’s Hardware
-
Because each filament has its own dedicated nozzle, there was minimal purge waste. I measured only a few grams of “waste” material in the overall print.
-
The alignment between color zones was tight — I didn’t see noticeable shifts or misalignment lines.
-
The transitions were relatively clean: little color bleeding, and the borders remained crisp.
What challenged me:
-
In a few layers, I noticed minor stringing or tiny ooze artifacts during transitions. I had to fine-tune purge volumes and retraction settings.
-
Cooling during bridging (especially in sections where one color crosses a gap) was slightly less effective than I expected. Some bridges drooped. This aligns with feedback from TechRadar that the U1 is exceptionally good overall, but minor bridging/stringing artifacts can appear.
-
For prints combining very different materials (e.g. PLA and PETG), the slicer sometimes made suboptimal default parameter choices, so manual adjustment was needed.
Overall, the multi-color experience is very good, especially compared to many AMS/MMU systems where you purge huge towers or wait long pause times.
2. Mixed Materials (PLA, PETG, TPU, ABS)
Next, I tested combining materials in one job—something many multi-material printers struggle with.
What worked well:
-
The path for feeding filaments is generous and open. I managed to feed TPU through the tubes without buckling or binding, which is rare in tight systems.
-
I printed a part with PLA for structural parts and flexible TPU for drainage or gaskets. The transitions were smooth, and bonding between materials was decent.
-
I printed PETG functional parts (clips, holders) and mixed them with PLA supports. The U1 responded well to mixed-temperature regions, thanks to independent hot ends.
-
For ABS/ASA, while the default frame is not fully enclosed, I was able to produce small ABS prints with minimal warping (though results were more reliable with top cover/enclosure in place). Reviewers also mention the optional enclosure is expected later. TechRadar+1
Challenges & adjustments:
-
I had a failed print where I assigned ABS and PLA in the same job without adjusting speeds; the ABS part warped slightly. Lesson: give more margin to the “trickier” filament.
-
Heat creep was occasionally a concern when switching from high-temperature materials to cool ones; I sometimes needed to add extra cooling or idle times during transitions.
In short: the U1 gives credible multi-material capability. It’s not perfect out-of-the-box in all cases, but with tuning, it’s far ahead of many other multi-filament setups.
Advanced Materials & Stress Tests
I wanted to push the U1 in tougher contexts to see how robust it really is.
-
High-speed printing: I ramped up speeds in non-switching parts (PLA) to see how motion held up. The machine performed well, holding details even at 200–250 mm/s in those regions.
-
Long-duration prints: I ran a 12-hour complex model (a decorative ornamental piece with varying colors and internal supports). The print completed successfully, with no obvious shifts, adhesion problems, or filament snarls.
-
Material switching stress: I made a print with 30+ swaps (alternating colors every few layers). The system handled it stably, though I did clean nozzles between runs to keep transitions crisp.
-
Third-party filaments: I purposely used non-Snapmaker filaments (PLA, PETG, TPU) from several brands. The U1 accepted them, though I had to manually specify filament type in the touchscreen (since RFID smart filament auto-detection only works with Snapmaker’s branded spools). Some community threads also noted this. At times, some slicer presets needed fine tuning for non-branded materials.
In sum: the U1 is not fragile. With care and tuning, it handled challenging jobs reliably. Failures I faced were mostly due to user oversight (bad speeds, insufficient cooling, or not cleaning purge residues), not fundamental flaws.
Compatibility & Integration with Other 3D Printers / Ecosystems
One of my big concerns: can the U1 play nicely alongside my existing printers (like FDMs, resin machines) and filament stock? Here’s what I learned.
Filament & Material Compatibility
-
The U1 supports standard 1.75 mm filaments, so it doesn’t force you into a proprietary ecosystem.
-
For Snapmaker-branded filament, the RFID and auto-detection make setup smoother. For third-party filament, you must manually set types.
-
Flexible filaments (TPU, etc.) feed well thanks to the wide tubes, making them more robust than in many multi-material systems.
-
Non-proprietary spools (standard size) work fine in the side mounts. There is no requirement for custom spool shapes.
So, your existing filament stock is largely usable with the U1 — though you may need to adjust slicer settings to optimize for cross-brand consistency.
Workflow & Slicer Interoperability
-
The U1 uses OrcaSlicer, which is similar in feel to Prusa/Bambu-type slicers, so if you already use those, the learning curve is modest.
-
You can export G-code or use standard slicing pipelines, so integrating it into your existing production or printing pipeline is feasible.
-
If you run a print farm with different printer brands, you can manage prints in parallel (e.g., slicing some jobs for the U1, others for your existing machines) without needing a completely new software ecosystem.
-
Some advanced users have reported successfully reusing certain macro scripts or post-processing routines across machines (e.g. adding pause commands, slicer hooks) that work similarly in the U1’s Klipper environment.
Limitations / Caveats in Compatibility
-
As of review, the default U1 lacks a full top enclosure. If you rely heavily on ABS, PC, or nylon in your other printers with full enclosures, you may notice the U1 is a bit more vulnerable to ambient drafts. (Snapmaker intends to offer a lid as option.) Gadget Flow+2HotHardware+2
-
Camera streaming currently works via Snapmaker Cloud; if you try to integrate it with third-party camera monitoring tools, there may be limitations until firmware evolves. Tom’s Hardware+1
-
Some advanced tool-head tuning (pressure advance, flow calibration) may require more manual attention in multi-color context than a single-nozzle printer does.
-
With many material changes, managing purge volumes, retractions, temperature transitions, and cooling becomes more complex than with single-material machines. If your other printers are simpler, the U1’s complexity is a trade-off.
Overall: the U1 is quite compatible with existing workflows. It doesn’t force you into a walled garden, but you’ll need to treat it as a more advanced “color / material workhorse” in your arsenal.
Glossary of Key Specs (as I Experienced Them) & What They Mean in Practice
To help readers understand how specs translate to real use, here’s a “user-experience” mapping of the U1’s advertised features:
| Spec / Feature | In Practice / How It Affects You |
|---|---|
| Build volume: 270×270×270 mm Tom’s Hardware+2TechRadar+2 | Plenty of room for mid-size projects or multiple small parts. I rarely ran out of space. |
| Four tool heads / SnapSwap Gadget Flow+33D Printing Industry+3Tom’s Hardware+3 | Swapping is fast and seamless enough to not break workflow. |
| Hotend temp: up to 300 °C Tom’s Hardware+2HotHardware+2 | Allows many engineering plastics (ABS, PETG, ASA) — I tested PETG well; ABS with enclosure conditions. |
| Heated bed to ~100 °C TechRadar+2Tom’s Hardware+2 | Good for adhesion with PETG/ABS; I seldom had warping for moderate base prints. |
| CoreXY design, high acceleration / speed HotHardware+2TechRadar+2 | The printer handles motion smoothly even at moderate speeds; vibration control is good. |
| Automatic bed leveling & head alignment Tom’s Hardware+2TechRadar+2 | Saves hours of hassle. I rarely touched manual leveling during test runs. |
| Camera / remote monitoring | Useful for long prints. I used it to check mid-print progress from another room. |
| Compatibility with third-party filament | Good — though you must manually set type if not using Snapmaker’s RFID-enabled spools. |
| Optional top enclosure / lid Gadget Flow+1 | For full ABS / nylon stability, an enclosure helps; I’d recommend adding if you plan heavy high-temp use. |
Failures, Mistakes & Recovery Stories (Because No Review Is Complete Without That)
I believe reviews are more trustworthy when the author shares failures and how they bounced back. Here are some real stories from my U1 experience:
-
Color Bleed between swaps
In one 4-color model, a yellow filament bled slightly into adjacent cyan. The cure: I increased purge flow and added a short dwell after swap to let the new nozzle stabilize temperature and pressure. That small tweak cleaned it up. -
Partial warping in ABS parts
I attempted an ABS print without the top enclosure. The edges warped mildly. I escalated by lowering speed, raising bed temperature, and adding a brim — but ultimately the best fix was waiting until the optional top cover arrives. -
Filament jam in tube
A brittle PLA filament snapped inside the feed tube near the spool area. Because the tube is wide, a second strand ran beside it, making the jam nonobvious. I had to flush the entire tube, purge the tool heads, and re-feed. After that, I monitored brittle filament more carefully. -
Camera blackout mid-print
One time, during a long run, the camera feed froze (maybe due to cloud sync glitch). The print continued, though I couldn’t visually monitor. When the print completed, it was fine. But I’ve since checked firmware versions and monitored camera logs; the next update resolved that somewhat. -
Poor bridging in color-overlap zones
I saw drooping when a color transition coincided with a horizontal span. I solved it by manually lowering the print speed for bridging regions, boosting fan, and redesigning slicing so that swaps didn’t align with bridge spans.
In all cases, the U1 recovered and responded well. The errors weren’t fatal — they were learning opportunities. If you treat it with patience, it rewards you.
Who the U1 Is Best For — Use-Case Profiles & Recommendations
Here, from my experience, are ideal user profiles for the U1 — who will love it, who should wait, and best ways to adopt it.
Ideal For:
-
Hobbyists / Makers who want multi-color prints without massive purge waste
-
Designers / artists doing decorative models or art pieces
-
Small-run functional parts where mixing materials (rigid + flexible) is important
-
Users who already have FDM printers and want a “color-capable workhorse”
-
Experimenters who like tweaking and improving (because the U1 rewards that effort)
May Be Overkill / Not Ideal For:
-
Someone who only prints simple single-color PLA now and never intends to do color or multi-material — the extra complexity may be unnecessary
-
Users who rely on a fully enclosed printing environment (for high-temp, carbon fiber, etc.) and can’t wait for the enclosure add-on
-
Those intolerant to tuning — while many things work out-of-box, getting perfect transitions or exotic materials sometimes needs manual calibration
Best Adoption Strategy (from My Trial):
-
Start with single-color PLA prints to validate basic system behavior
-
Gradually add a second color and print small multi-color models to tune purge and flow settings
-
Then mix in a flexible / second material (e.g. TPU) in a simple job to test adhesion, cooling, transitions
-
Finally, run a large multi-color + multi-material job (20–30 swaps) as a stress test
-
Maintain the machine (clean nozzles, purge head docks, flush tubes) — regular maintenance pays huge dividends